
How to set up SSSD with Active Directory
Note:
This documentation has moved to a new home! Please update your bookmarks to the new URL for the up-to-date version of this page.
This section describes the use of SSSD to authenticate user logins against an Active Directory via using SSSD’s “ad” provider. At the end, Active Directory users will be able to log in on the host using their AD credentials. Group membership will also be maintained.
Group Policies for Ubuntu
SSSD manages user authentication and sets initial security policies.
ADSys serves as a Group Policy client for Ubuntu, streamlining the configuration of Ubuntu systems within a Microsoft Active Directory environment. If you are interested in Group Policies support for Ubuntu, detailed information can be found in the ADSys documentation.
Prerequisites and assumptions
This guide does not explain Active Directory, how it works, how to set one up, or how to maintain it. It assumes that a working Active Directory domain is already configured and you have access to the credentials to join a machine to that domain.
- The domain controller is:
- Acting as an authoritative DNS server for the domain.
- The primary DNS resolver (check with
systemd-resolve --status).
- System time is correct and in sync, maintained via a service like
chronyorntp. - The domain used in this example is
ad1.example.com.
Install necessary software
Install the following packages:
sudo apt install sssd-ad sssd-tools realmd adcli
Join the domain
We will use the realm command, from the realmd package, to join the domain and create the SSSD configuration.
Let’s verify the domain is discoverable via DNS:
$ sudo realm -v discover ad1.example.com
 * Resolving: _ldap._tcp.ad1.example.com
 * Performing LDAP DSE lookup on: 10.51.0.5
 * Successfully discovered: ad1.example.com
ad1.example.com
  type: kerberos
  realm-name: AD1.EXAMPLE.COM
  domain-name: ad1.example.com
  configured: no
  server-software: active-directory
  client-software: sssd
  required-package: sssd-tools
  required-package: sssd
  required-package: libnss-sss
  required-package: libpam-sss
  required-package: adcli
  required-package: samba-common-bin
This performs several checks and determines the best software stack to use with SSSD. SSSD can install the missing packages via packagekit, but we already installed them in the previous step.
Now let’s join the domain:
$ sudo realm join ad1.example.com
Password for Administrator:
That was quite uneventful. If you want to see what it was doing, pass the -v option:
$ sudo realm join -v ad1.example.com
 * Resolving: _ldap._tcp.ad1.example.com
 * Performing LDAP DSE lookup on: 10.51.0.5
 * Successfully discovered: ad1.example.com
Password for Administrator:
 * Unconditionally checking packages
 * Resolving required packages
 * LANG=C /usr/sbin/adcli join --verbose --domain ad1.example.com --domain-realm AD1.EXAMPLE.COM --domain-controller 10.51.0.5 --login-type user --login-user Administrator --stdin-password
 * Using domain name: ad1.example.com
 * Calculated computer account name from fqdn: AD-CLIENT
 * Using domain realm: ad1.example.com
 * Sending NetLogon ping to domain controller: 10.51.0.5
 * Received NetLogon info from: SERVER1.ad1.example.com
 * Wrote out krb5.conf snippet to /var/cache/realmd/adcli-krb5-hUfTUg/krb5.d/adcli-krb5-conf-hv2kzi
 * Authenticated as user: Administrator@AD1.EXAMPLE.COM
 * Looked up short domain name: AD1
 * Looked up domain SID: S-1-5-21-2660147319-831819607-3409034899
 * Using fully qualified name: ad-client.ad1.example.com
 * Using domain name: ad1.example.com
 * Using computer account name: AD-CLIENT
 * Using domain realm: ad1.example.com
 * Calculated computer account name from fqdn: AD-CLIENT
 * Generated 120 character computer password
 * Using keytab: FILE:/etc/krb5.keytab
 * Found computer account for AD-CLIENT$ at: CN=AD-CLIENT,CN=Computers,DC=ad1,DC=example,DC=com
 * Sending NetLogon ping to domain controller: 10.51.0.5
 * Received NetLogon info from: SERVER1.ad1.example.com
 * Set computer password
 * Retrieved kvno '3' for computer account in directory: CN=AD-CLIENT,CN=Computers,DC=ad1,DC=example,DC=com
 * Checking RestrictedKrbHost/ad-client.ad1.example.com
 *    Added RestrictedKrbHost/ad-client.ad1.example.com
 * Checking RestrictedKrbHost/AD-CLIENT
 *    Added RestrictedKrbHost/AD-CLIENT
 * Checking host/ad-client.ad1.example.com
 *    Added host/ad-client.ad1.example.com
 * Checking host/AD-CLIENT
 *    Added host/AD-CLIENT
 * Discovered which keytab salt to use
 * Added the entries to the keytab: AD-CLIENT$@AD1.EXAMPLE.COM: FILE:/etc/krb5.keytab
 * Added the entries to the keytab: host/AD-CLIENT@AD1.EXAMPLE.COM: FILE:/etc/krb5.keytab
 * Added the entries to the keytab: host/ad-client.ad1.example.com@AD1.EXAMPLE.COM: FILE:/etc/krb5.keytab
 * Added the entries to the keytab: RestrictedKrbHost/AD-CLIENT@AD1.EXAMPLE.COM: FILE:/etc/krb5.keytab
 * Added the entries to the keytab: RestrictedKrbHost/ad-client.ad1.example.com@AD1.EXAMPLE.COM: FILE:/etc/krb5.keytab
 * /usr/sbin/update-rc.d sssd enable
 * /usr/sbin/service sssd restart
 * Successfully enrolled machine in realm
By default, realm will use the “Administrator” account of the domain to request the join. If you need to use another account, pass it to the tool with the -U option.
Another popular way of joining a domain is using a One Time Password (OTP) token. For that, use the --one-time-password option.
SSSD configuration
The realm tool already took care of creating an SSSD configuration, adding the PAM and NSS modules, and starting the necessary services.
Let’s take a look at /etc/sssd/sssd.conf:
[sssd]
domains = ad1.example.com
config_file_version = 2
services = nss, pam

[domain/ad1.example.com]
default_shell = /bin/bash
krb5_store_password_if_offline = True
cache_credentials = True
krb5_realm = AD1.EXAMPLE.COM
realmd_tags = manages-system joined-with-adcli
id_provider = ad
fallback_homedir = /home/%u@%d
ad_domain = ad1.example.com
use_fully_qualified_names = True
ldap_id_mapping = True
access_provider = ad
Note:
Something very important to remember is that this file must have permissions0600and ownershiproot:root, or else SSSD won’t start!
Let’s highlight a few things from this config file:
cache_credentials: This allows logins when the AD server is unreachablefallback_homedir: The home directory. By default,/home/<user>@<domain>. For example, the AD user john will have a home directory of /home/john@ad1.example.com.use_fully_qualified_names: Users will be of the formuser@domain, not justuser. This should only be changed if you are certain no other domains will ever join the AD forest, via one of the several possible trust relationships.
Automatic home directory creation
What the realm tool didn’t do for us is setup pam_mkhomedir, so that network users can get a home directory when they login. This remaining step can be done by running the following command:
sudo pam-auth-update --enable mkhomedir
Testing our setup
You should now be able to fetch information about AD users. In this example, John Smith is an AD user:
$ getent passwd john@ad1.example.com
john@ad1.example.com:*:1725801106:1725800513:John Smith:/home/john@ad1.example.com:/bin/bash
Let’s see his groups:
$ groups john@ad1.example.com
john@ad1.example.com : domain users@ad1.example.com engineering@ad1.example.com
Note:
If you just changed the group membership of a user, it may be a while before SSSD notices due to caching.
Finally, how about we try a login:
$ sudo login
ad-client login: john@ad1.example.com
Password:
Welcome to Ubuntu 20.04 LTS (GNU/Linux 5.4.0-24-generic x86_64)
...
Creating directory '/home/john@ad1.example.com'.
john@ad1.example.com@ad-client:~$
Notice how the home directory was automatically created.
You can also use SSH, but note that the command will look a bit funny because of the multiple @ signs:
$ ssh john@ad1.example.com@10.51.0.11
Welcome to Ubuntu 20.04 LTS (GNU/Linux 5.4.0-24-generic x86_64)
(...)
Last login: Thu Apr 16 21:22:55 2020
john@ad1.example.com@ad-client:~$
Note:
In the SSH example, public key authentication was used, so no password was required. Remember that SSH password authentication is disabled by default in/etc/ssh/sshd_config.
Kerberos tickets
If you install krb5-user, your AD users will also get a Kerberos ticket upon logging in:
john@ad1.example.com@ad-client:~$ klist
Ticket cache: FILE:/tmp/krb5cc_1725801106_9UxVIz
Default principal: john@AD1.EXAMPLE.COM

Valid starting     Expires            Service principal
04/16/20 21:32:12  04/17/20 07:32:12  krbtgt/AD1.EXAMPLE.COM@AD1.EXAMPLE.COM
	renew until 04/17/20 21:32:12
Note:
realmalso configured/etc/krb5.conffor you, so there should be no further configuration prompts when installingkrb5-user.
Let’s test with smbclient using Kerberos authentication to list the shares of the domain controller:
john@ad1.example.com@ad-client:~$ smbclient -k -L server1.ad1.example.com

	Sharename       Type      Comment
	---------       ----      -------
	ADMIN$          Disk      Remote Admin
	C$              Disk      Default share
	IPC$            IPC       Remote IPC
	NETLOGON        Disk      Logon server share
	SYSVOL          Disk      Logon server share
SMB1 disabled -- no workgroup available
Notice how we now have a ticket for the cifs service, which was used for the share list above:
john@ad1.example.com@ad-client:~$ klist
Ticket cache: FILE:/tmp/krb5cc_1725801106_9UxVIz
Default principal: john@AD1.EXAMPLE.COM

Valid starting     Expires            Service principal
04/16/20 21:32:12  04/17/20 07:32:12  krbtgt/AD1.EXAMPLE.COM@AD1.EXAMPLE.COM
	renew until 04/17/20 21:32:12
04/16/20 21:32:21  04/17/20 07:32:12  cifs/server1.ad1.example.com@AD1.EXAMPLE.COM
Ubuntu Desktop authentication
The desktop login only shows local users in the list to pick from, and that’s on purpose.
To login with an Active Directory user for the first time, follow these steps:
- Click on the “Not listed?” option:

- Type in the login name followed by the password:
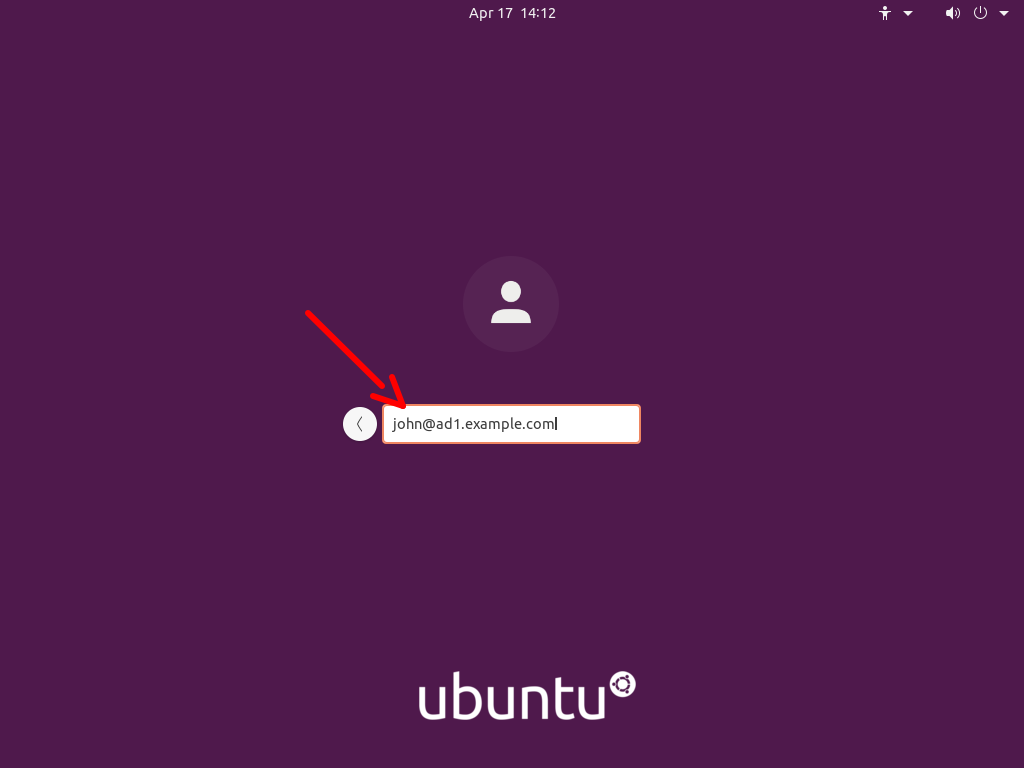
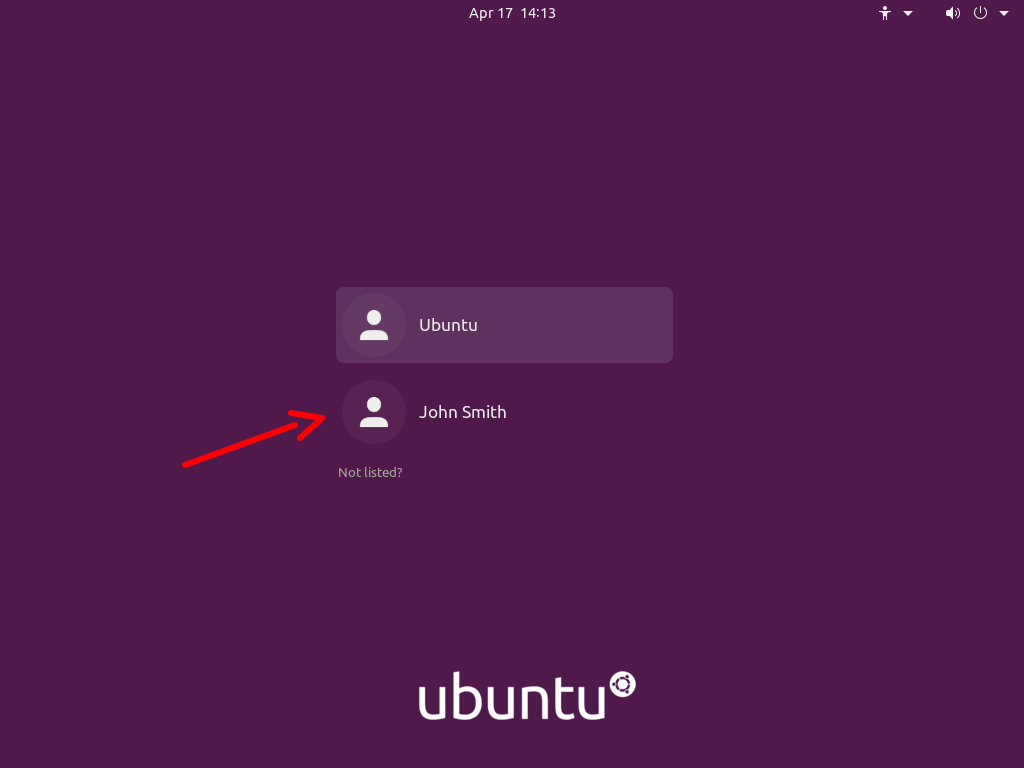
- Next time you login, the AD user will be listed as if it was a local user:
Known issues
When logging in on a system joined with an Active Directory domain, sssd (the package responsible for this integration) will try to apply Group Policies by default. There are cases where if a specific policy is missing, the login will be denied.
This is being tracked in bug #1934997. Until the fix becomes available, please see comment #5 in that bug report for existing workarounds.