
%27%20fill%3D%27%23E95420%27%3E%3Cpath%20d%3D%27m15.839%205.293-1.447-2.8a.136.136%200%200%200-.051-.055.144.144%200%200%200-.074-.02h-5.8a.143.143%200%200%200-.091.03.13.13%200%200%200-.034.17.138.138%200%200%200%20.072.06l7.251%202.8a.144.144%200%200%200%20.17-.054.13.13%200%200%200%20.007-.13l-.003-.001ZM11.839%204.945.073.223A.073.073%200%200%200%20.026.221a.07.07%200%200%200-.038.027.065.065%200%200%200%20.007.086l7.962%208.182a.069.069%200%200%200%20.049.022.072.072%200%200%200%20.047-.019l3.805-3.461a.066.066%200%200%200%20.02-.061.065.065%200%200%200-.014-.03.07.07%200%200%200-.028-.02l.003-.002ZM5.382%207.183a.071.071%200%200%200-.062-.022.07.07%200%200%200-.03.011.067.067%200%200%200-.023.025l-4.13%207.696a.065.065%200%200%200-.005.046.068.068%200%200%200%20.027.038.072.072%200%200%200%20.09-.006L7.13%209.18a.066.066%200%200%200%200-.087l-1.75-1.91Z%27%2F%3E%3C%2Fg%3E%3Cdefs%3E%3CclipPath%20id%3D%27a%27%3E%3Cpath%20fill%3D%27%23fff%27%20d%3D%27M0%200h15.83v15.21H0z%27%2F%3E%3C%2FclipPath%3E%3C%2Fdefs%3E%3C%2Fsvg%3E)

%27%20fill%3D%27%23E95420%27%3E%3Cpath%20d%3D%27M1.936%202.592c.668%200%201.21-.515%201.21-1.151S2.604.29%201.936.29C1.267.29.726.805.726%201.44c0%20.637.541%201.152%201.21%201.152ZM14.56.576H3.404a1.587%201.587%200%200%201%20.024%201.69l-.026.04h11.156a.56.56%200%200%200%20.386-.15.518.518%200%200%200%20.16-.369v-.692a.502.502%200%200%200-.16-.369.543.543%200%200%200-.386-.15ZM1.936%206.701c.668%200%201.21-.515%201.21-1.15%200-.637-.542-1.152-1.21-1.152-.669%200-1.21.515-1.21%201.151s.541%201.151%201.21%201.151ZM14.56%204.685H3.404a1.612%201.612%200%200%201%20.242%201.083c-.03.215-.105.421-.219.608l-.026.04h11.157a.56.56%200%200%200%20.386-.15.518.518%200%200%200%20.16-.37v-.692a.5.5%200%200%200-.16-.369.542.542%200%200%200-.386-.15ZM1.936%2010.81c.668%200%201.21-.515%201.21-1.15%200-.637-.542-1.152-1.21-1.152-.669%200-1.21.515-1.21%201.151s.541%201.151%201.21%201.151ZM14.56%208.795H3.404a1.611%201.611%200%200%201%20.243%201.082%201.581%201.581%200%200%201-.245.648h11.156a.559.559%200%200%200%20.386-.15.517.517%200%200%200%20.16-.37v-.692a.502.502%200%200%200-.16-.368.543.543%200%200%200-.386-.15ZM1.936%2014.92c.668%200%201.21-.515%201.21-1.15%200-.637-.542-1.152-1.21-1.152-.669%200-1.21.515-1.21%201.151s.541%201.151%201.21%201.151ZM14.56%2012.904H3.404a1.611%201.611%200%200%201%20.242%201.082%201.58%201.58%200%200%201-.219.608l-.026.04h11.157a.562.562%200%200%200%20.386-.15.517.517%200%200%200%20.16-.37v-.692a.5.5%200%200%200-.16-.369.543.543%200%200%200-.386-.15Z%27%2F%3E%3C%2Fg%3E%3Cdefs%3E%3CclipPath%20id%3D%27a%27%3E%3Cpath%20fill%3D%27%23fff%27%20d%3D%27M0%200h15.83v15.21H0z%27%2F%3E%3C%2FclipPath%3E%3C%2Fdefs%3E%3C%2Fsvg%3E)
%27%20fill%3D%27%23E95420%27%3E%3Cpath%20d%3D%27M9.618.272c-.634%200-1.243.243-1.691.674-.448.43-.7%201.015-.701%201.624v4.221a1.9%201.9%200%200%201%201.362%200v-4.22a.955.955%200%200%201%20.291-.72%201.067%201.067%200%200%201%201.479%200%20.955.955%200%200%201%20.29.719v.962h1.363V2.57c0-.61-.253-1.194-.702-1.625A2.445%202.445%200%200%200%209.618.272ZM9.017%208.433c0%20.21-.065.417-.187.593a1.102%201.102%200%200%201-.499.393c-.203.08-.426.102-.642.06a1.125%201.125%200%200%201-.568-.292%201.055%201.055%200%200%201-.304-.547%201.028%201.028%200%200%201%20.064-.616c.084-.195.226-.362.41-.479a1.143%201.143%200%200%201%201.401.133c.103.1.185.217.24.347.057.129.085.268.085.408ZM2.773%205.855c-.634.001-1.242.244-1.69.674C.633%206.96.381%207.545.38%208.154v4.082a1.901%201.901%200%200%201%201.363%200V8.154a.955.955%200%200%201%20.29-.719%201.067%201.067%200%200%201%201.479%200%20.955.955%200%200%201%20.29.719v.962h1.363v-.962c0-.61-.253-1.194-.702-1.625a2.444%202.444%200%200%200-1.69-.674ZM2.166%2013.878c0%20.21-.065.415-.186.59-.121.174-.294.31-.496.39-.202.08-.424.102-.638.06a1.119%201.119%200%200%201-.565-.29%201.049%201.049%200%200%201-.302-.543c-.043-.206-.02-.42.063-.614.084-.194.225-.36.407-.476a1.136%201.136%200%200%201%201.394.133%201.024%201.024%200%200%201%20.323.75Z%27%2F%3E%3Cpath%20d%3D%27M14.752%204.76a1.789%201.789%200%200%201-.681-.126v2.411a.972.972%200%200%201-.312.682c-.193.179-.45.28-.718.28-.268%200-.526-.101-.718-.28a.972.972%200%200%201-.312-.682V4.32h-1.363v2.726c0%20.61.252%201.195.7%201.626a2.443%202.443%200%200%200%201.692.673c.635%200%201.244-.242%201.692-.673.449-.431.7-1.016.7-1.626v-2.41a1.9%201.9%200%200%201-.68.125ZM15.858%202.822c.037.225%200%20.455-.107.658a1.1%201.1%200%200%201-.49.472%201.161%201.161%200%200%201-1.302-.198%201.04%201.04%200%200%201-.206-1.251%201.1%201.1%200%200%201%20.492-.47%201.161%201.161%200%200%201%201.299.199c.166.16.276.366.314.59ZM7.907%2010.2c-.233%200-.465-.042-.681-.126V12.6a.97.97%200%200%201-.302.7%201.05%201.05%200%200%201-.728.29%201.05%201.05%200%200%201-.728-.29.97.97%200%200%201-.302-.7V9.845H3.804V12.6c0%20.61.252%201.194.7%201.625a2.443%202.443%200%200%200%201.692.674c.634%200%201.243-.243%201.692-.674.448-.43.7-1.015.7-1.625v-2.526a1.887%201.887%200%200%201-.68.127Z%27%2F%3E%3C%2Fg%3E%3Cdefs%3E%3CclipPath%20id%3D%27a%27%3E%3Cpath%20fill%3D%27%23fff%27%20d%3D%27M0%200h15.83v15.21H0z%27%2F%3E%3C%2FclipPath%3E%3C%2Fdefs%3E%3C%2Fsvg%3E)

How to upgrade from Windows 7 to Ubuntu – Installation

Igor Ljubuncic
on 4 February 2020
Tags: dual boot , installation , Migration , Ubuntu , upgrade , Virtual Machines , VirtualBox , Virtualisation , Windows 7
Installing an operating system is not an easy task. For most people, this is something they will never have done. The vast majority of people buy computers with the operating system already installed, so they never have to manually run through the system setup. The process can be intimidating, but we will try to make it as simple as possible.
In this article, we’d like to continue the journey we started last week – how to successfully migrate from Windows 7 to Ubuntu. In the first article, we talked about the preparation steps – the differences between Windows and Ubuntu, software parity, hardware support, and data backup ahead of the change. Here, we will show you how to safely install Ubuntu. In the last tutorial of this series, we will tour the Ubuntu desktop, install popular applications, and learn how to use Ubuntu.
Terminology
Let’s start with the phrases we will use in this tutorial. Some of the terms can seem vague at this point, but they will make more sense as we go along.
The setup of a new operating system is broadly called installation. The installation has several stages:
- You need to download the installation media (think an exe file in Windows for an application setup). The installation media will usually come in the form of ISO files. For instance, if you download Ubuntu, then you will find a file called something like ubuntu-18.04.3-desktop-amd64.iso in your download folder location.
- You need to copy the contents of the installation media to an external device, DVD or thumb drive. This is done with a dedicated tool, which will correctly prepare the external device for use, and store the contents of the installation media on it.
- You need to boot (start) the external device on your computer. Typically, this means connecting the external media (placing a DVD into the tray or inserting a thumb drive into a USB port). Next, you need to instruct your computer to boot from the external media. Some computers are configured to do this automatically. In other cases, you will need to access your computer’s setup (usually by pressing F2 or Del keys early on when the computer is powered on or rebooted), and then change a setting called boot order. We will cover this in more detail later on.
- Once the computer correctly identifies the external media, it will boot the operating system on this media. What this means, Ubuntu will now start. Do not worry, the installation will not begin right away. If left with no user interaction, Ubuntu will launch into the live mode, which means your underlying hardware (disks) will not be touched, and you can safely test and experiment with Ubuntu before you decide to make any changes.
- In the live environment, you can play around to get the sense of how Ubuntu works, try applications, and verify your hardware is correctly initialized. Once you’re happy and confident with the overall look & feel, you can proceed to install the operating system.
- The actual installation is the next step. At this point, the operating system will warn you that changes are going to be written to your hard disk, so you can back out if you are unsure or do not want to proceed, for any reason. Once the installation completes, the next time you reboot your computer, it will start Ubuntu.
| Phrase | Windows | Linux |
|---|---|---|
| Installation media | ISO file | ISO file |
| Boot sequence | The startup of a computer | The startup of a computer |
| Live session | N/A | A session in which the operating system runs in memory only and does not touch the hard disks; it is great for non-destructive testing of the operating system and software |
| Installation | Copy of the installation media to hard drive and user setup | Copy of the installation media to hard drive and user setup |
| Partitioning | The installation sub-step during which the hard disk is configured | The installation sub-step during which the hard disk is configured |
| Partition | A logical slice of the hard disk. In Windows, these are identified by drive letters, like C:\, D:\ | Partitions in Linux use the following notation: /dev/sdXyX – letter (a, b, c, etc) that denotes which the hard disk number. If you have only one hard disk, it will be a.Y – number that denotes the partition on a particular hard disk. For instance, /dev/sda3 denotes the third partition on the first hard disk. |
| Filesystem | The logical structure used to store files on a drive. By default, Windows uses NTFS. | By default, Linux uses Ext4. Linux supports many other filesystems, and can also read/write Windows filesystems. |
| Mountpoint | The logical endpoint by which the filesystem on a particular partition is made accessible to the user. Synonymous with how partitions are shown to the user through Window Explorer (C:\, D:\, etc). | In Linux, there is a single tree that contains all mount points to all filesystems. The top-tree element is called root, and it is identified by the forward-slash character (/). Entries under the root will then point to different folders/files. For example: /usr – folder that contains application data. It can be mapped to any partition/filesystem (e.g.: /dev/sda5)/home – folder that contains user data, like application settings and documents. It can be mapped to any partition/filesystem (e.g.: /dev/sdb6) |
| Formatting | The process of initialization of a partition with a new filesystem. This is a destructive process. | The process of initialization of a partition with a new filesystem. This is a destructive process. |
Installation types
There are multiple ways operating systems can be configured – this is not unique to Ubuntu; this is true for all operating systems out there.
- A Single operating system on a computer – the most typical and common scenario. A hard disk contains a single operating system. It is relatively simple to configure and maintain. Most Windows 7 users will have PCs or laptops set up this way.
- Dual boot – This is a configuration where there are two operating systems installed on the same computer. Each operating system could reside on a separate hard disk, or they could both be installed on one hard disk, on different partitions. In a dual-boot setup, usually there will be a menu displayed early on in the boot sequence of the computer, allowing the user to choose which operating system they want to run. On physical systems, only one operating system can run at one time. A dual-boot setup could be Windows 7 and Ubuntu, side by side. You can then alternate between the two and use them as you see fit, with a reboot in between each use.
- Multi boot – Like dual-boot, but there are three or more operating systems.
- Virtualization – This is a concept that allows one to run an entire operating system on top of another operating system. This is done using a dedicated piece of software called hypervisor. The hypervisor software runs on your host operating system, and it allows you to create virtual machines that emulate hardware. You can then install a guest operating system on top of this emulated hardware, and use them side by side. Virtualization isn’t trivial, but it is a good way to test new operating systems without trying them on your physical hardware. This way, you can practice using Linux, get comfortable with the installation steps before you do anything on your actual PC or laptop.
If you decide to install Ubuntu, the sequence of steps will be slightly different based on your choice of the configuration (single boot, dual boot, etc).
If you want to replace Windows 7 with Ubuntu, you will need to:
- Format your C:\ drive (with the Linux Ext4 filesystem) as part of the Ubuntu setup. This will delete all your data on that particular hard disk or partition, so you must have a data backup in place first.
- Install Ubuntu on the newly formatted partition.
If you want to dual-boot Windows with Ubuntu – even as a transition step until you get accustomed to using Ubuntu, you will need to choose one of the two options below:
- Allow Ubuntu installer to configure things automatically – most likely, it will be able to set up the two operating systems side by side.
- Alternatively, you will need to change the hard disk and/or partition layout so there’s at least one new partition that can accommodate the installation of Ubuntu. This may require changing the size of existing partitions (shrinking) to create space for a new partition. In some cases, this may not be possible, or you may not have sufficient disk space. The management of partitions can be done in the Ubuntu live session using a tool called Gparted partition manager (available by default in Ubuntu). You will need to be comfortable with the Linux hard disk and partition notation to use this software. You also must be careful, because most operations are destructive, so if you delete or format partitions, you could lose your data or render your computer unbootable. Then, you can install Ubuntu on the newly created and formatted partition.
Practice: Ubuntu installation as a virtual machine
Please note: This scenario will not actually migrate you from Windows 7 to Ubuntu. However, it is a very useful exercise, as it will help you get familiar and comfortable with the new operating system, so you can then commit to a setup on physical hardware – and actually replace Windows 7.
Let’s start with the simplest and safest of scenarios – we will install VirtualBox, a free virtualization software, create an Ubuntu virtual machine template, and then run through the installation.
- Download Ubuntu ISO. You can either download the LTS image, which comes with five years of support, or one of the interim releases, which have a 9-month support timeframe and ship with some of the newer features and applications than what you get by default in an LTS version. It’s a trade-off between stability and support on one end and using the latest software on the other.
- Download VirtualBox and install it in Windows. You are not limited to where you install the software. This can be done in any version of Windows, or even other operating systems.
- Start VirtualBox, and create a new Ubuntu virtual machine.
- Create a virtual hard disk for Ubuntu.
- Create a virtual optical storage device (this will be the virtual DVD drive). We will “run” the ISO file from it. Effectively, when the virtual machine starts, it will treat the optical storage device with the ISO attached to it as though you had copied the ISO contents to a DVD or a USB thumb drive, and booted this on a physical computer.
- Follow the guided wizard to install Ubuntu. Pay attention to the hard disk setup.
VirtualBox configuration
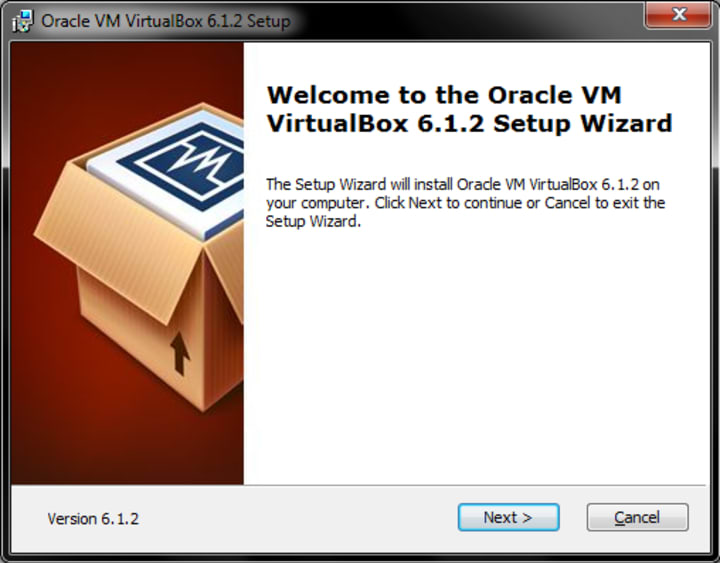
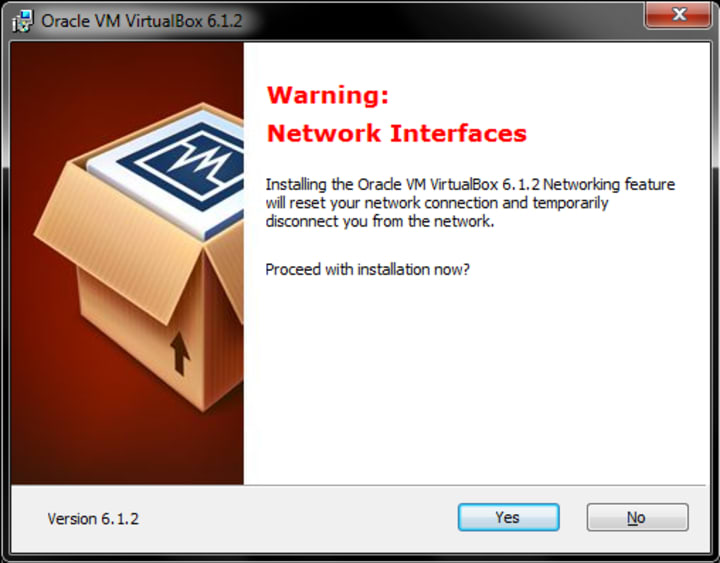
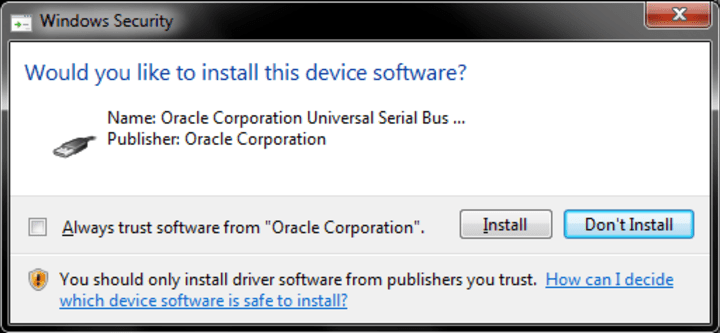
Run the downloaded VirtualBox setup exe, and follow the instructions. The one part where you need to pay attention is the configuration of network adapters. By design, virtualization products create virtual machines (computers), with their own virtual hardware, including network. You will need to approve the installation of VirtualBox network drivers (signed by Oracle).

New virtual machine setup
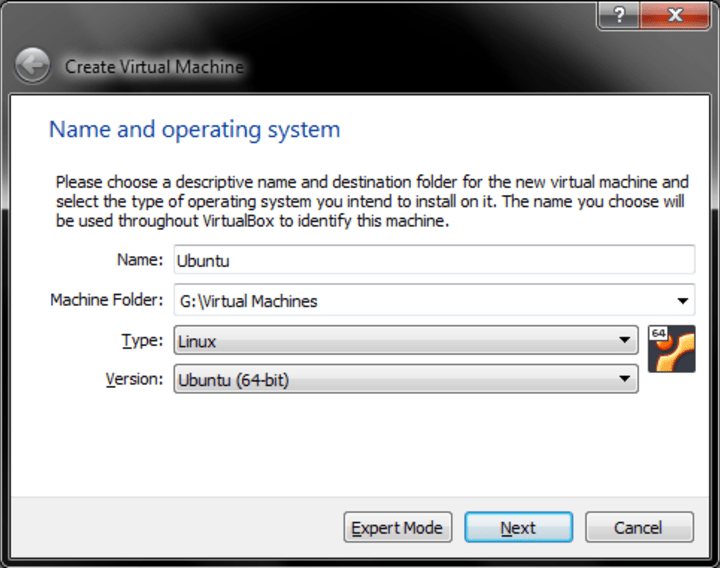
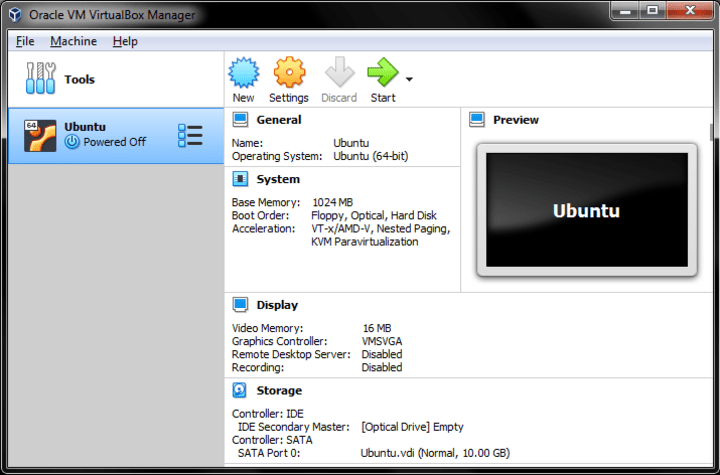
Once VirtualBox is installed and configured, start the application. Click on the New button. You will now be asked several questions. You will need to provide the name for your virtual machine (VM). You can use anything, like John or Jane, but it is best to use the exact operating system version. If you type in Ubuntu, VirtualBox will automatically detect what you’re trying to do.

The next step is decide how much RAM you want to give your VM. Then, you need to configure a virtual hard disk. Once these steps are complete, the VM is ready to start. However, we also need to attach the Ubuntu ISO to it.
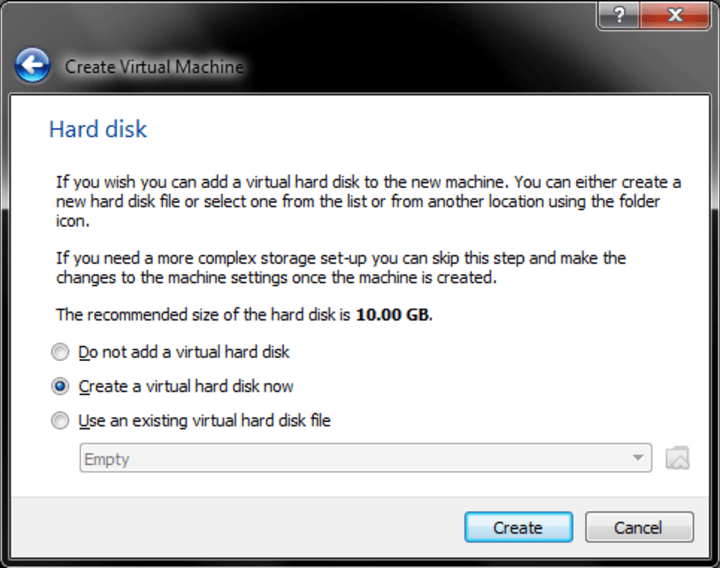
Click on Settings. In the new window, click on Storage. In the right panel, there will be multiple Storage Devices listed – think hard disks and DVD trays on a physical computer. You will have your hard disk there (in the .vdi format), and an empty IDE controller with a virtual optical drive attached to it. Select it, and then, from the drop down menu, select Choose a disk file… and navigate to where you downloaded the Ubuntu ISO (called something like ubuntu-18.04.3-desktop-amd64.iso). After you complete this step, you can start the VM, and it should boot from the “external” media (in this case the virtual DVD tray).

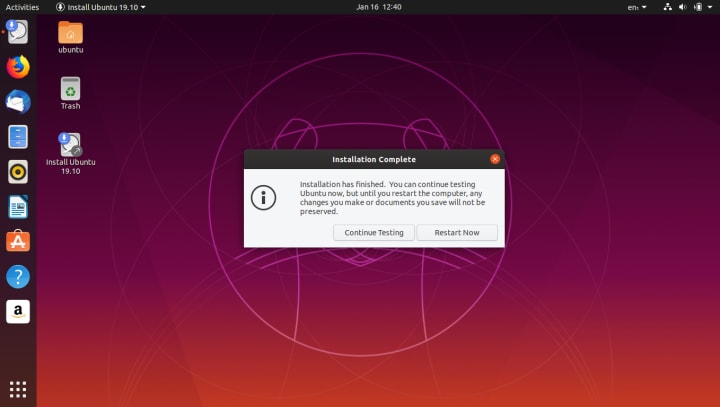
Once you start the virtual machine, you will see Ubuntu launch.

Ubuntu live session
On startup, Ubuntu will ask you what you want to do – Try Ubuntu or Install Ubuntu.
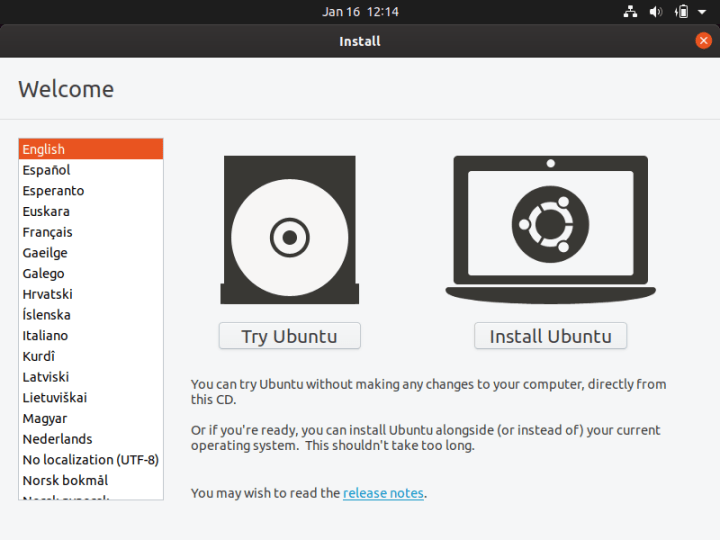
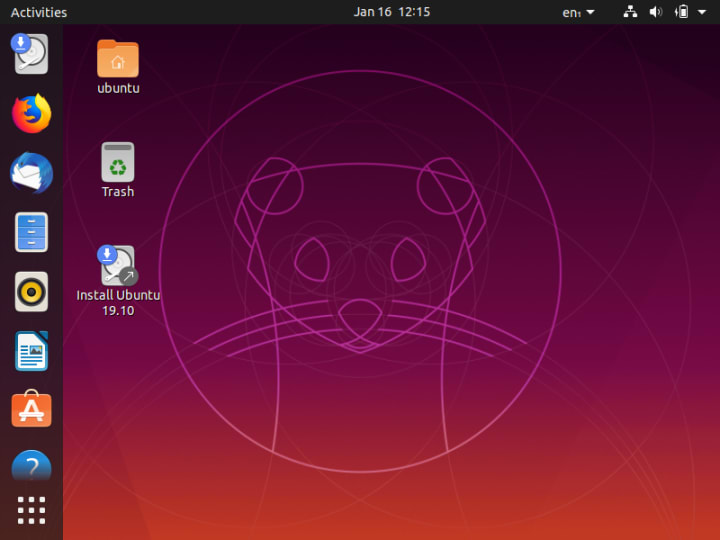
If you select Try Ubuntu, the operating system will launch into a live session, running from memory. Your disks are untouched at this stage. You can play around, get the feel for the operating system and its desktop layout, try network connectivity, test applications, and more. Once you’re ready to install Ubuntu, click on the desktop icon, or the installer shortcut in the vertical taskbar on the left.
Ubuntu installation wizard
The installation process is done with a step-by-step wizard. The first step is just a Welcome note and installer language selection.

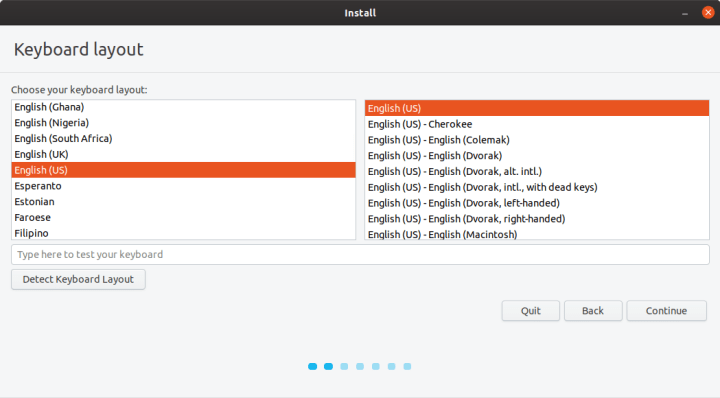
Keyboard layout
The second step is to choose your keyboard layout. You can always add more layouts (and languages) after the installation.
Connect to the Internet
The optional third step is network. If you’re using a desktop and have a wired connection, you probably won’t see this step in the installer. If you’re on a laptop with a wireless connection, the installer will ask you if you want to connect to an access point. This is not mandatory, but it does allow you to install updates before you get to the desktop. Alternatively, you can connect to the network from the top taskbar (panel), via a drop-down menu in the right corner.
Updates and other software
The fourth step is to decide what setup you like. Most people want the normal installation, which comes with a complete desktop and a set of productivity applications. You can also choose to install third-party software, graphics drivers and media codecs (last checkbox). This is recommended, as it will give you access to a wider range of applications and use cases.

Installation type
In the virtual machine, your hard disk will contain no data. This is why the installer will notify you that it cannot detect any operating systems. It also makes the first option – Erase disk and install Ubuntu – perfectly safe to run.

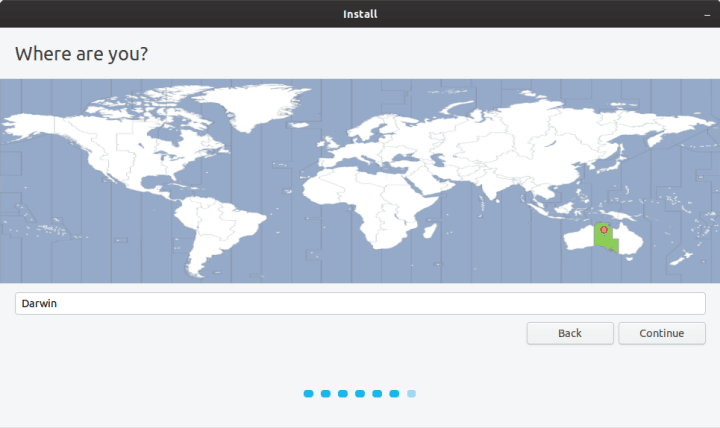
Timezone and user setup
The installation will begin now in the background. You will be able to configure your timezone and your user. The choice of the timezone will determine your language locale. For instance, if you’ve selected English (US) as your keyboard layout and choose London, UK as your timezone, Ubuntu will be configured with British English as the desktop interface language. You will be able to change this after the installation if you like.
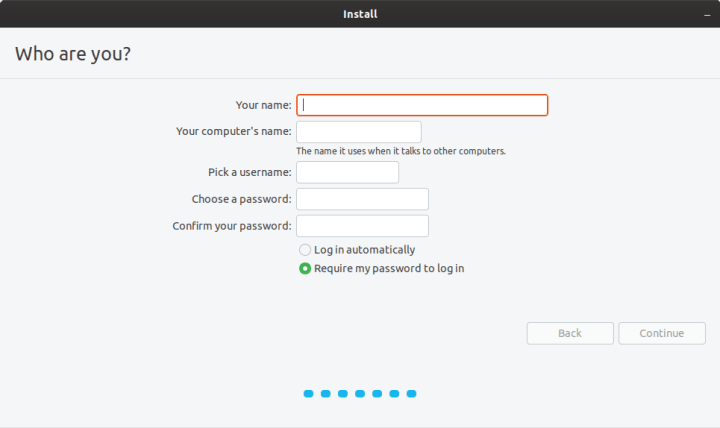
The user setup is self-explanatory – choose your name, computer name and your password. You can auto-login into the desktop, or have the system ask you for your credentials to allow you to login.
Ubuntu installation on a physical machine with an existing Windows 7 operating system
Here, we will configure a dual-boot setup. Once again, we are not getting rid of Windows 7 just yet. But this scenario allows us to test Ubuntu on physical hardware without altering the Windows 7 data. This way we will gain additional knowledge and practice ahead of the actual migration.
After you have mastered this step, you can then re-run the installation and replace Windows 7 with Ubuntu (on the same PC or a different computer, if you like). Alternatively, you can simply reuse the Windows 7 partition(s) inside Ubuntu as additional storage space.
- Download Ubuntu ISO.
- Download UNetbootin and burn the Ubuntu ISO to a DVD, or download unetbootin and use it to copy the Ubuntu ISO to a USB thumb drive.
- Insert the installation media into the computer (DVD tray or USB port), access the BIOS of your computer, choose the installation media, and boot it. This will launch the Ubuntu live session.
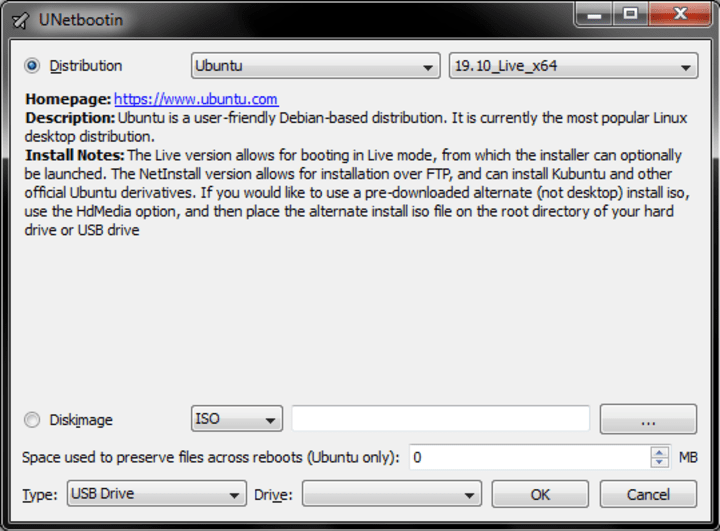
Prepare external media
Launch the UNetbootin tool. You have two options available: 1) download Ubuntu from the tool directly and then copy it to the USB drive 2) load a previously downloaded ISO image. Either option will work fine. Since we’ve downloaded the ISO already, check the Diskimage button, locate the ISO file on your disk.
Boot Ubuntu
Once the USB drive is ready, insert it into your computer, and power it on. Some computers are automatically configured to boot from external media first. In that case, you won’t need to do anything. Other computers require a manual change to the startup order. This is done by editing the BIOS boot menu. Each hardware manufacturer uses its own BIOS implementation, so there is no uniform way to do this. Typically, you will need to press a key (F2 or Del or alike) to access BIOS, and then you will need to change the Boot order or Boot options so that your system starts from the external device containing the Ubuntu operating system.
Ubuntu installation wizard (physical hardware)
The first four steps in the installer are identical to the virtual machine. The real difference is whether there is any information stored on the hard disk(s). In a virtual machine, the hard disk was empty, and it did not contain any partitions (like a new computer). On a computer that has Windows 7 installed, the installer will show different options.
Installation type
Most likely, the installer will inform you it has found Windows 7 and will suggest installing Ubuntu alongside it. Effectively, the installer will try to find the most suitable partition, allow you to shrink it, create a new partition in the free space after the resizing, and install Ubuntu on it.
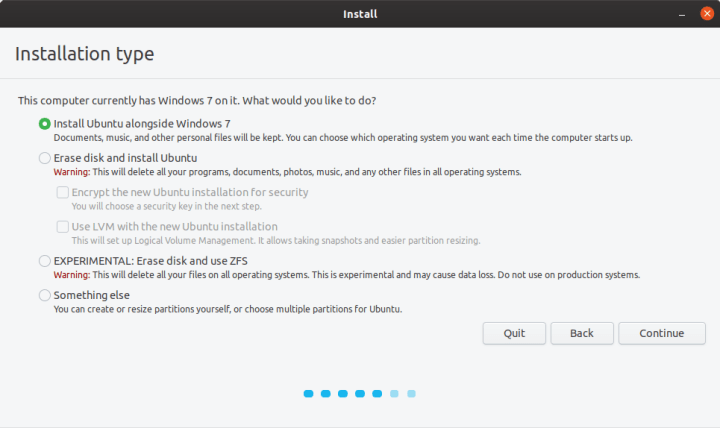
Alternatively, if you do not care about anything on your hard disk – or feel comfortable with completely removing Windows 7 – you can use the second option, erase everything, and setup Ubuntu as the only operating system. If you have safely backed up your data from Windows 7, you can use this option. If you’re not sure, the best way is to start with the dual-boot option, and then eventually fully replace Windows 7 once you’re confident with using Ubuntu.
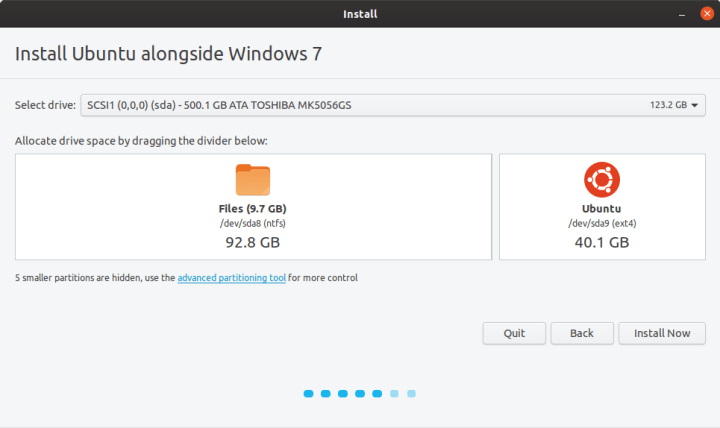
If you select the first option (Ubuntu alongside Windows 7), the next step in the installer allows you to allocate drive space. You can drag the divider to decide how much you want to resize the Windows partition – Ubuntu will be installed in the remainder.
If you are familiar with the concepts of disk and partition management, you can also use the last option – Something else, where you can make changes manually to partitions as you see fit. These are non-trivial steps, and not recommended for new users.
Advanced: Manual partitioning
If you do not want to use the dual-boot option, or the installer cannot set it up automatically for you, you will need to manually configure the partitions. In the Ubuntu desktop, click on Activities, type Gparted in the search box, launch the application. It will scan your hard disks and show you a table of results.

The image above is from a laptop with a Windows 7 installation. It has a single 500GB hard disk, shown as /dev/sda (465.76 GiB). It has a total of eight partitions:
- /dev/sda1 is the Windows hidden system/boot partition.
- /dev/sda2 is the actual C:\ drive – this is not immediately obvious from this list, but you can deduce it from the rest of the information, and also by comparing size to what it should be in Windows 7.
- /dev/sda3 is a special type of partition. Without going into too many technical details, it is an extended partition – a special type of primary partition that can nest logical partitions. On computer systems that use the ms-dos type of partition table, there is a limitation of four (primary) partitions. To work around this limitation, you can create the extended one to span a large part of the hard disk space, and then create logical partitions inside it. Newer systems using the gpt type do not have this limitation.
- /dev/sda5 is the first logical partition. There is no /dev/sda4, and logical partitions will always be numbered 5 and above. This partition has NTFS filesystem and even carries a label – Games, so you know what type of data it contains. The label can help you prevent damage by trying to modify partitions that contain important data.
- /dev/sda6, /dev/sda7 and /dev/sda8 are logical partitions, with labels, containing additional user data.
From the data presented by GParted, we do not have sufficient free space, so we will need to change the partition layout. We can either delete one of the non-C:\ partitions, or resize them. The last partition, dev/sds8 (labeled Downloads) looks like a good candidate. It is a large partition, and most likely contains less critical data. Click on a partition and select Resize from the menu. Gparted will attempt to run this operating, and if successful, you will have free space available to set up Ubuntu.
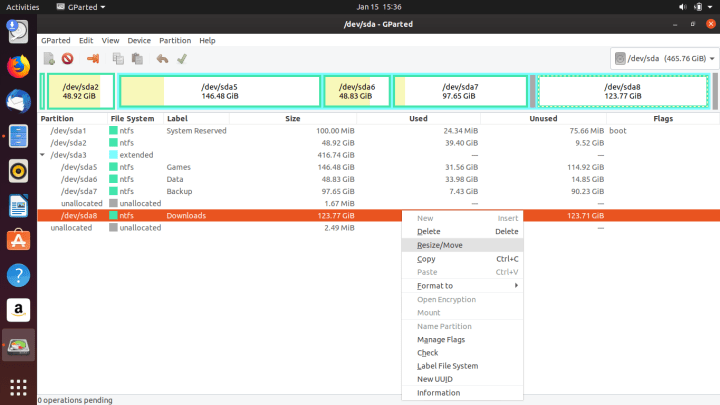
In the Ubuntu alongside Windows 7 option, the installer automatically selected/dev/sda8 as the candidate for the installation. If your computer only has one partition (essentially the C:\ drive), you will need to resize it. This means you do need sufficient free space, and you must safely back up your data, as hard disk operations can be risky.
User setup
The remaining steps in the installation are identical. After the setup completes, and you restart your computer, you will see a text menu on startup, and you can select which operating system to boot into – Ubuntu or Windows 7.
Our installation setup is now complete.
Summary
We have completed the most complex and difficult part of the journey. When you need to manage your storage, there is always some risk involved, but since we have safely backed up our data in the first article, the chances of data loss are low. The installation requires knowledge that most computer users won’t readily have, but hopefully, you have now gained the necessary skills and practice to do this with relative ease. The next step is to explore the Ubuntu desktop – and even have some fun. We will do this in the third installment of this series.
Photo by Jonatan Pie on Unsplash.
Talk to us today
Interested in running Ubuntu in your organisation?